Modern companies know that almost everybody has an email address that they use regularly. Be it for online shopping, registering for your favorite services, or just wanting to communicate with friends and family, the number of email addresses that have been and are being created is endless. With the arrival of email came the arrival of spam, messages that are unwelcome in your inbox. Blacklisting was the answer to the spam problem, allowing users to block certain email addresses from sending them any further messages. Sometimes, however, there are company announcements or important messages that get blocked by mistake. The answer to this problem? Email Whitelisting.
A whitelist is a list of accepted items or persons, often displayed as email addresses or domain names, that you allow to receive messages from through an email blocking software. If you would like to receive our content and updates, be sure to add the corresponding Nerds on Call email address to your email whitelist.
Every email delivery system is different, meaning that setting up your whitelist could require different steps across different platforms. If you have not already, be sure to whitelist us now so that the delivery of news, content, and advice is uninterrupted. Below are intructons for setting up your email whitelist in Gmail, Yahoo, Mac Mail, and Microsoft Outlook.
Gmail
1. In your inbox, locate an email from Nerds on Call
2. Drag this email to the “primary” tab of your inbox.
3. You’ll see that our emails will go to your primary folder in the future!
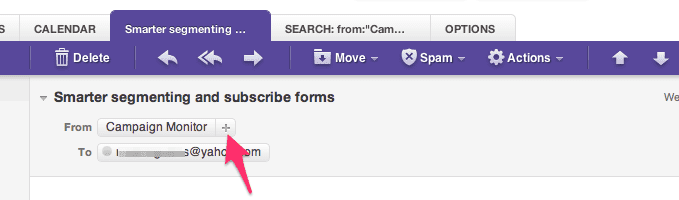
Yahoo! Mail
When opening an email message, a “+” symbol should display next to From: and the sender’s name. Select this and an “Add to contacts” pop-up should appear. Select “Save”:
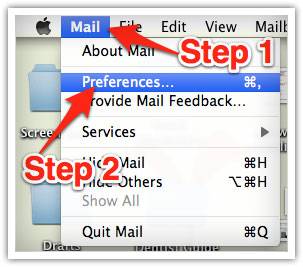
Mac Mail
Select “Mail” and “Preferences” from the top menu.
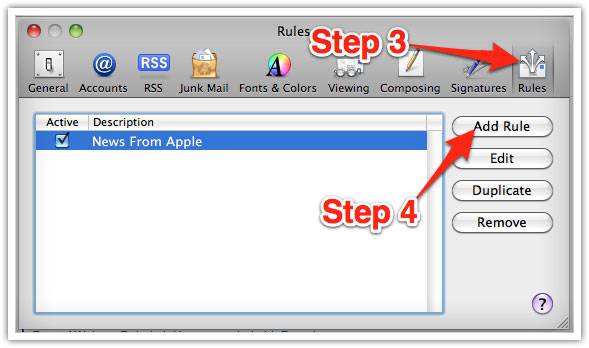
In the “Preferences” window, click the “Rules” icon.
Click the “Add Rule” button.
In the “Rules” window, type a name for your rule in the “Description” field.
Use the following settings: “If any of the following conditions are met: From Contains.”
Type the sender’s email address in the text field beside “Contains.”
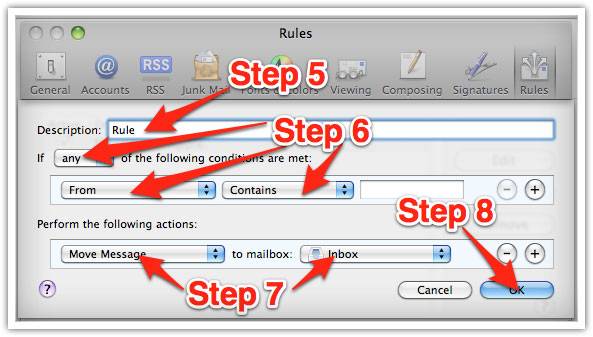
Select “Move Message” and “Inbox” from the drop-down menus.
Click “Ok” to save the rule.
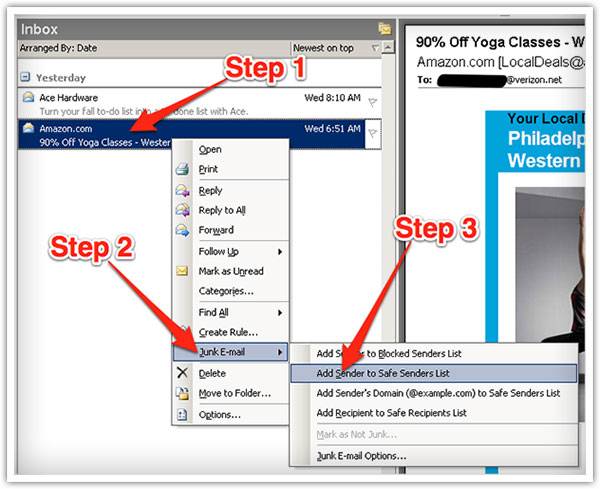
Outlook 2003 & Later
- Right-click on the message in your inbox.
- Select “Junk E-mail” from the menu.
- Click “Add Sender to Safe Senders List.”

About The Author: Andrea Eldridge is CEO and co-founder of Nerds On Call, a computer repair company that specializes in on-site and online service for homes and businesses. Andrea is the writer of a weekly column, Nerd Chick Adventures in The Record Searchlight. She prepares TV segments for and appears regularly on CBS, CW and FOX on shows such as Good Day Sacramento, More Good Day Portland, and CBS 13 News, offering viewers technology and lifestyle tips. See Andrea in action at callnerds.com/andrea/.